But you will need to complete a few pre-requisite quests before Trachraet can give you the quest. Let’s look at the full series of quests to go through:
Quick Step-by-Step Unlock Guide
Detailed Unlocking Guide
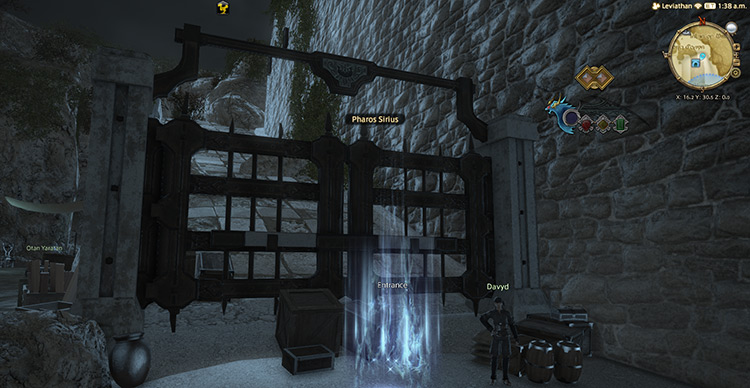
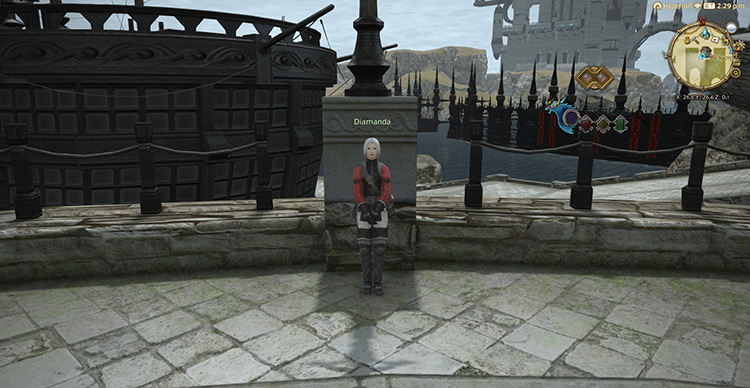
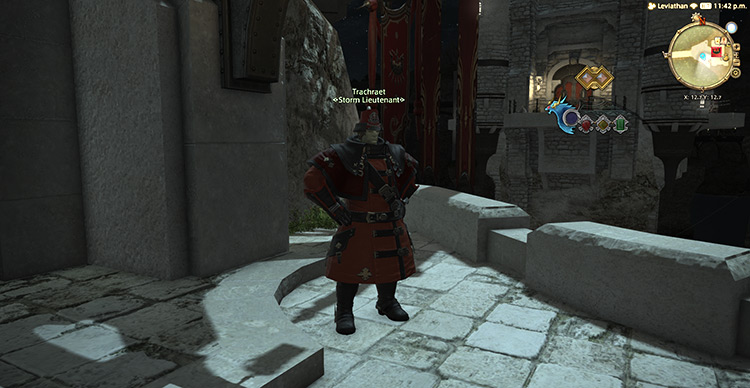
Start this whole process by completing the Main Scenario Quest (MSQ) “The Ultimate Weapon” from Raubahn in Northern Thanalan (X:15.0, Y:16.0). This quest is part of the Main Scenario Questline for patch 2.0 of Final Fantasy XIV: A Realm Reborn, so you need to finish every MSQ leading up to “The Ultimate Weapon” before you can start unlocking the dungeon. After finishing the MSQ, head to Diamanda in Western La Noscea (X:26.5, Y:26.7) to start the Pharos Sirius Questline. Naturally, before you can unlock the hard version of the dungeon, you need to complete the regular version first. Accept the quest “Sirius Business” from Diamanda and enter the normal mode of Pharos Sirius. You need to have at least a level 50 Disciple of War of Magic job and an average item level of 48 to enter. Once you clear Pharos Sirius and complete the quest, go back to Diamanda and accept the quest “Why So Sirius” to wrap up the story of the dungeon’s normal mode. To continue the Pharos Sirius Questline, you need to finish the MSQ “Heavensward” from the Guidance Node in Azys Lla (X:16.0, Y:22.0). This quest is part of the Main Scenario Questline for patch 3.0 of Final Fantasy XIV: Heavensward, so you need to finish every MSQ leading up to “Heavensward.” This could take a while due to the number of MSQ patches (2.0 to 3.0) you might need to complete. Once you finally finish the quest “Heavensward,” head to Limsa Lominsa Upper Decks (X:12.7, Y:12.8) and get the quest “Things Are Getting Sirius” from Trachraet. Trachaet will tell you about the kobold invasion that forced the smiths restoring Pharos Sirius to flee. With the lighthouse’s restoration in danger, Trachaet will ask you to go to Western La Noscea to learn more about how to resolve the situation. Talk to the Storm Flyer in Western La Noscea (X:16.1, Y:30.3), where he will mention a story of one of the smiths saying that the kobolds intend to blow up the lighthouse. After Maelstrom Command assesses the situation, you will be asked to enter Pharos Sirius once again to drive out the kobolds. After this conversation with the Storm Flyer, Pharos Sirius (Hard) will be unlocked. To enter the dungeon, you’ll need at least a level 60 Disciple of War or Magic job and an average item level of 170. Since this dungeon was released way back in patch 3.1, it’s very easy to solo when you enter the dungeon unsynced with a level 90+ character. Though if you encounter this dungeon in a duty roulette, you will need to do it synced.
Boss Strategy Guide
To help you clear the dungeon quickly, here’s a breakdown of each boss and their rewards:
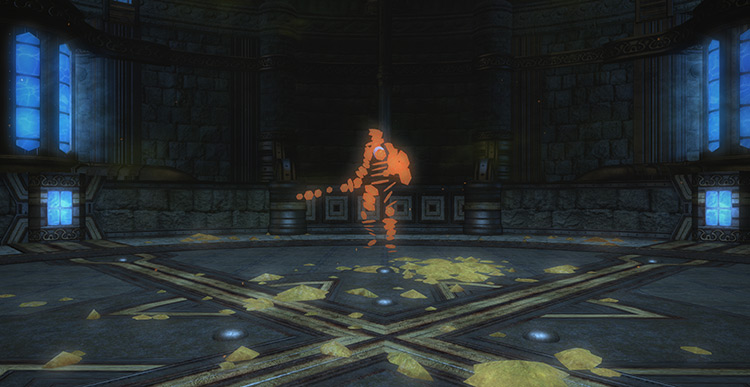
Boss #1: Ghrah Luminary
Mechanics: You will notice some birds and spiders on the outer edges of the arena. Remember where these creatures are throughout the fight to help you handle the mechanics.
Vorpal Blade: The boss’ non-telegraphed normal attack can cleave. Tanks need to face the boss away from the party. Luminous Lancet: Circle AoEs targeting three players. These AoEs are easy to dodge, so avoid them as much as possible. Prey: Orbs will spawn and tether to players. After some time, the orbs will spawn “Corruption” mobs depending on who the orbs were tethered to. Corruption (Humanoid): Mobs that spawn if the orb is still tethered to a player when the “Prey” timer ticks down. This mob can use a frontal cone AoE and will also buff the boss’ damage. To avoid this scenario, always tether your orbs to a bird or a spider. Corruption (Bird): Spawns if the orb is tethered to a bird when the “Prey” timer ticks down. This mob will drop a poisonous AoE puddle upon death. Kill these birds near the outer edges of the arena. Corruption (Spider): Spawns if the orb is tethered to a spider when the “Prey” timer ticks down. This mob can use point-blank AoE attacks.
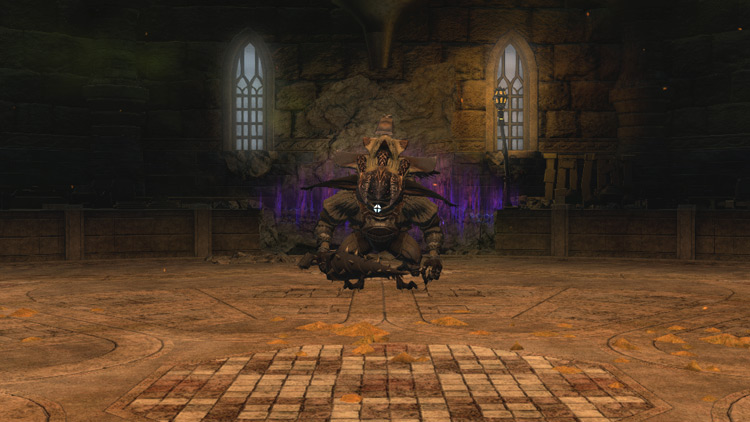
Boss #2: 8th Order Patriarch Be Gu
Mechanics:
Strip Mine: A proximity-based AoE marker. Move away from the marker to reduce incoming damage. Aether Valves + Corrupted Gel: Ruptured valves will appear around the arena along with “Corrupted Gel” mobs. The gel mobs should be killed over the ruptured valves to stop the leakage of aether. These mobs will also explode and deal room-wide damage if left alone for too long. Kill the “Corrupted Gels” on top of a ruptured valve as soon as possible. 8th Order Furnaceman + Alchemy Engine: Two pairs of “Alchemy Engines” and “8th “Order Furnacemen” will spawn. During this period, any player that attacks the boss will get stunned for two seconds, then get hit by “Loose Screw.” Furnacemen will also drop AoEs at random areas of the arena occasionally. To handle this mechanic, kill the engines first, then the furnacemen. Avoid hitting the boss until the furnacemen are down. Loose Screw: The boss will charge the players that attack him during the “8th Order Furnacemen + Alchemy Engine” phase. Avoid hitting the boss while the mobs are still up to prevent unnecessary damage.
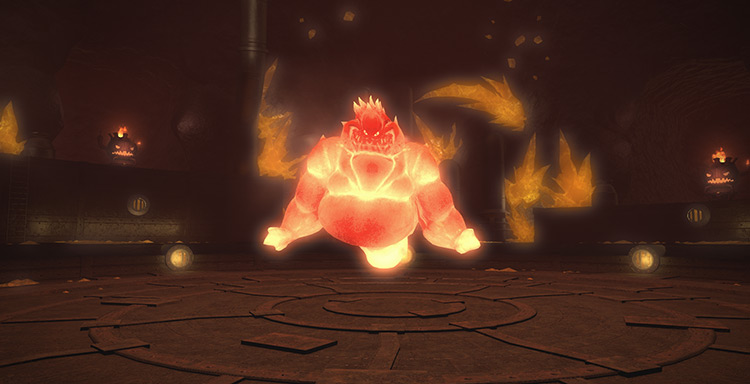
Boss #3: Progenitrix and Progenitor
Mechanics: This fight will have two phases – the Progenitrix phase and the Progenitor phase.
Scalding Scolding: The boss’ non-telegraphed normal attack can cleave. Tanks need to face the boss away from the party. Bombshell Drop: One “Grey Bomb” and two “Lava Bombs” will spawn throughout the arena. The “Grey Bomb” will grow over time and eventually explode. Kill the “Grey Bomb,” then the “Lava Bombs.” Sap: Large circle AoE attack. This attack has a relatively slow cast time, so it’s easy to avoid. Big Burst: When the boss’ HP falls to 1%, it will cast a room-wide attack that hits very hard. This mechanic also signals the start of the second phase. Mitigate and heal through the damage.
Three “Grey Bombs” and three “Lava Bombs” will spawn after Progenitrix uses “Big Burst”. Handle these bombs similar to the “Bombshell Drop” mechanic. Progenitor will spawn after the bombs are killed.
Blue Flame: The boss will occasionally cast a room-wide AoE damage throughout this phase. This attack will also apply a stacking debuff that lowers your fire resistance. Mitigate and heal through the damage. If the fight lasts for too long, this attack will become deadly. Big Burst + Grey Bomb and Remedy Bomb: The boss will use “Big Burst” to start its own bomb phase. This time, blue “Remedy Bombs” will accompany the “Grey Bombs.” If the “Remedy Bombs” get too close to the “Grey Bombs,” they will explode and likely kill the party. “Remedy Bombs” can be knocked back with an attack, so make sure to push any of them that are getting close to the “Grey Bombs.” Similar to the Progenitrix Phase, kill the “Grey Bombs” first.
Extra Treasure Coffers
Apart from the boss rewards, there are four treasure coffers located throughout the dungeon that you can open for more gear rewards:
(X:11.3, Y:10.0) (X:10.9, Y:10.5) (X:10.7, Y:9.7) (X:8.8, Y:9.6)